Translation workflow
Sending content to XTM for localization
XTM Connect - Figma users can send a whole page or individual frames for translation to XTM. Follow these steps:
Select the content you wish to send for translation such as a whole page or an individual frame.
Right-click to access the connector. Select Plugins > Development > XTM > XTM Connect - Figma.
Fill in the required details in the Add content tab:
XTM Customer
XTM Template
Source language
Target language(s)
Optionally you can select:
Active XTM projects: You can only use this option if all preceding options are exactly the same as in the project already sent to XTM.
Due date.
Generate and upload screenshot:
Thanks to this option linguists can see the context of the source content. Sending large files with screenshots to XTM might cause performance issues.
Segment IDs must be enabled in XTM for this feature to work as required. Contact support to enable segment IDs.
Tip
Contact XTM Support:
support@xtm.cloud
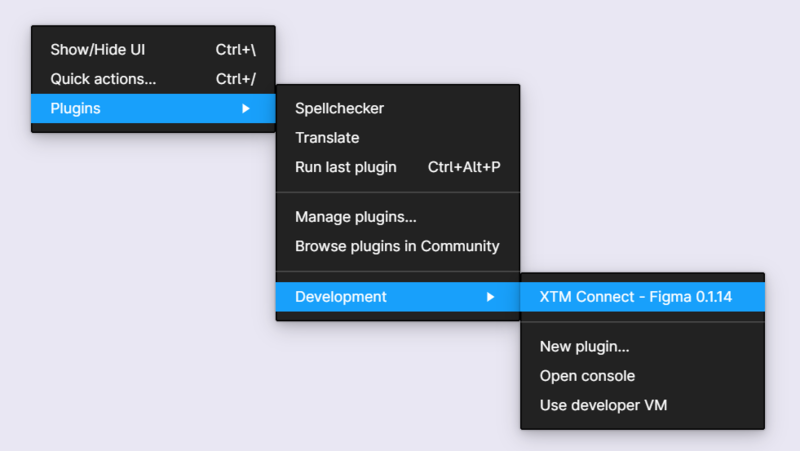
Accessing XTM - Connect Figma
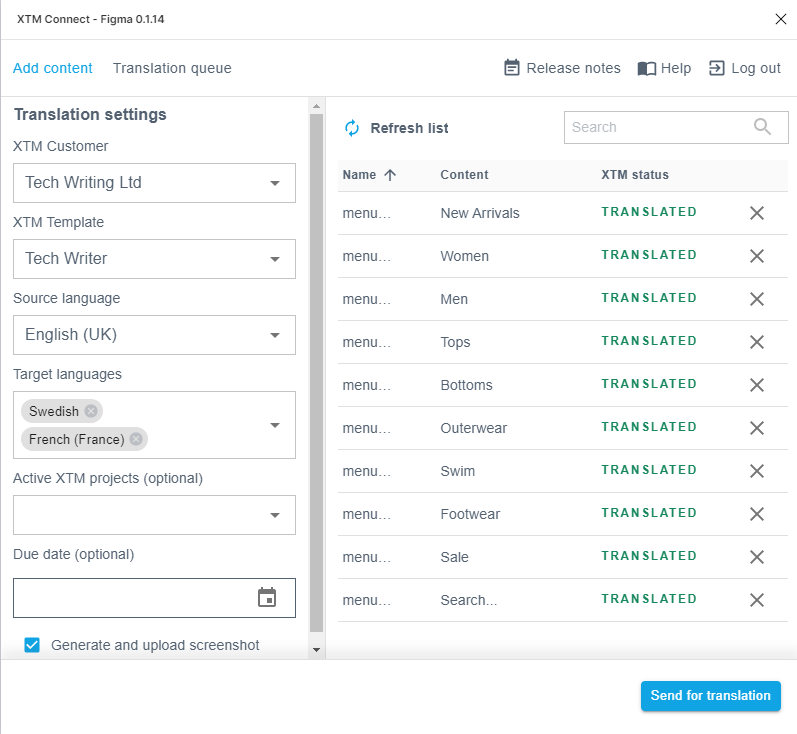
Adding content

XTM view with segment IDs enabled: source context visible
Importing content
Depending on the configuration settings of the connector, translated content can be either placed automatically in the Pages panel or imported from the Translation queue in the connector. You can import pages for each language separately or all at once if the Import all button has been enabled in the configuration.
The import all button must be enabled by the administrator in the configuration settings.
Go to the Translation queue tab in the connector.
Content with the Finished status can be imported by clicking on the Import button
 . Check Queue entry statuses XTM Connect - Figma for more detail on statuses.
Imported content is placed in the Figma Pages panel. Corresponding language code is added to the page name to distinguish it from other pages.
Translation queue entry statuses XTM Connect - Figma
The translation queue entry statuses table shows in detail the current step in the translation workflow. You can check the progress of translation and import translated content.

XTM Connect - Figma Translation queue entry statuses
Queue entry status | Explanation |
|---|---|
Sent | Indicates that an item has been sent to XTM. |
In progress | Indicates that the project has reached XTM, and a workflow step has been started. The progress of the XTM job takes into account the percentage of finished segments and activated workflow steps. |
Cancelled | Indicates that a job has been cancelled or archived in XTM by a Project Manager. To remove the entry from the queue: select the |
Finished | Indicates that an item has been translated and is ready for manual import. You have to import the entry manually: Select the import icon |

Localization settings
Language code is added to the translated content to distinguish it from the source page. Source file MyPage translated to French (France) is imported as MyPage_fr_FR.
For the language variant, the corresponding code will be added: MyPage translated to French (Canada) will be imported as MyPage_fr_CA. Check Adding Language combination to check how to add source and target languages in XTM.
Languages are imported from XTM and correspond to the Language combination defined for the relevant customer.
Add a new language combination in XTM
Go to Customers > Select [Your customer] > Language combinations > Modify and use.
Select the required language combination from the list.
Select Save.
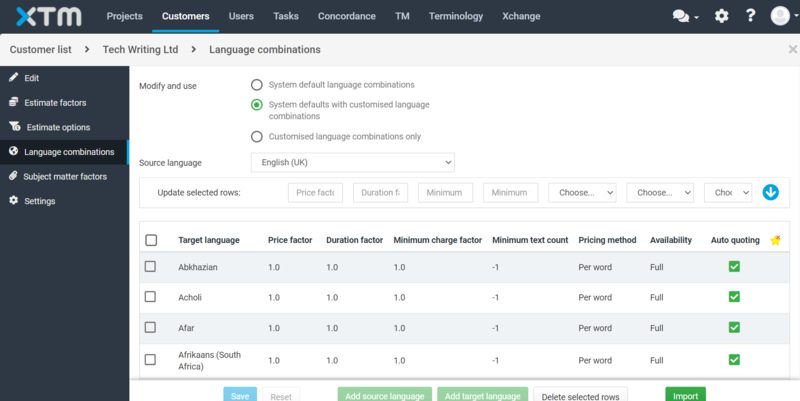
Adding language combinations